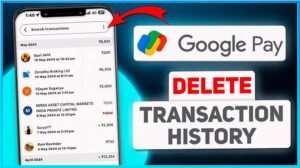
Delete Google Pay Transitions History
Hey, listen up! Google Pay just dropped Savergram tech updates some cool new features at the Global Fintech Fest . Here’s what they’ve got:
1. UPI Circle: You can now let your trusted friends make payments for you, even if they don’t have a bank account.
2. UPI Vouchers (eRupi): Generate prepaid vouchers linked to mobile numbers for easy digital payments.
3. Clickpay QR Scan: Pay bills in a snap by scanning customized QR codes.
4. Prepaid Utility Payments: Set up recurring payments for your utility bills and never miss a due date again.
5. Tap & Pay with RuPay Cards: Go contactless with your RuPay cards for quick and secure payments.
6. UPI Lite Autopay: Keep your UPI Lite account topped up automatically so you always have enough balance.
Pretty cool stuff, right?
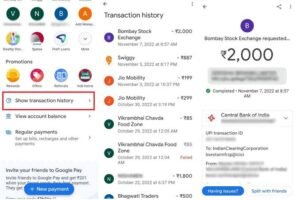
To review your Google Pay transaction history, please follow these steps:
1. Launch the Google Pay application.
2. Navigate to the “Manage your Money” section and select the option to “See transaction history.”
3. You will be presented with a comprehensive list of all transactions conducted through Google Pay. To obtain additional details, simply click on any specific transaction.
Furthermore, you have the ability to filter transactions based on various criteria, including status, payment method, date, or amount, to locate specific entries efficiently.
Should you encounter any difficulties, kindly ensure that your application is updated to the latest version. If the issue persists, please try again at a later time.
In Google Pay, you can filter your transaction history with these options: 🔎
– Status: Completed, Failed, or In Progress.
– Payment Method: Bank account or UPI Lite.
– Date: This month, Last 30 days, or Last 90 days.
– Amount: Set a minimum and maximum.
– Payment Type: Cashback, Money Received, or Self-Transfers.
You can filter your Google Pay transaction history by timeframe using the Date filter. You have predefined options such as:
This month 📆
Last 30 days 🗓️
Last 90 days 🗓️
Additionally, you can select a custom date range to specify the exact start and end dates for your transactions, allowing for more precise filtering of your transaction history
To filter transactions by the team that created them, follow these steps:
1. Access the Transactions Page: Navigate to the relevant section in your transaction management system.
2. Select the Team Filter: If you have a Business Owner, Admin, or Bookkeeper role, locate the Team filter option.
3. Choose a Team: Select the specific team from the dropdown menu to view transactions associated with that team.
Please note that this feature is not available for employees, as they can only view their own transactions.
Google Pay is a versatile digital wallet that enables users to:
– Make contactless payments at physical stores and online.
– Send or request funds from friends and family.
– Split bills and make group payments.
– Store loyalty and gift cards.
– Access transit fares in select cities.
It operates securely by utilizing tokenization, ensuring that actual card numbers are not shared with merchants. Google Pay is compatible with Android devices and integrates with various banking services for immediate transactions.
To add a card to Google Pay, please follow these steps:
1. Launch the Google Pay application on your mobile device.
2. Tap on your profile image, then select the “Bank Accounts and Cards” option.
3. Choose the “Add Card” option.
4. Enter the following card details: card number, expiration date, CVV, and billing address.
5. Accept the Terms & Conditions and tap the “Save” button.
6. Verify your device and enter the OTP sent to your registered phone number.
7. Once verified, your card will be ready for use.
Please note that this process is currently only available for Android devices.
Here are some of the benefits of using Google Pay over traditional payment methods:
1. Convenience: With Google Pay, you can make contactless payments using just your smartphone, eliminating the need to carry cash or cards.
2. Enhanced Security: Google Pay uses tokenization technology to ensure that your actual card number is not shared during transactions, reducing the risk of fraud.
3. Speed: Transactions are processed quickly, often faster than swiping a card or handling cash.
4. Integrated Features: Google Pay allows you to manage loyalty cards, send money to friends, and access transaction insights all within one app.

5. No Additional Fees: Google Pay does not charge any extra fees for using the service, aside from standard card fees.
Google Pay does not charge any fees for international transfers. However, its partners, Wise and Western Union, may charge fees depending on the chosen service provider.
While Google Pay itself is free for sending money internationally from the USA to India and Singapore, these partners may impose transfer fees and different exchange rates. It is important to carefully review their specific terms and conditions to fully understand any associated costs.
Hey, listen up! If you wanna get rid of your Google Pay transaction history, here’s what you gotta do:
On your phone:
1. Open the Google Pay app.
2. Tap your profile icon and go to Settings.
3. Choose Privacy & Security, then Data & Personalization.
4. Tap the Google Account link.
5. Go to Payments & Subscriptions > Payment Info.
6. Under Payments Transactions & Activity, tap the cross icon to delete specific transactions or hit the Delete button to wipe out a bunch of ’em.
On your computer:
1. Go to myaccount.google.com.
2. Click on Payments & Subscriptions.
3. Head over to Payments Transactions & Activity to delete transactions one by one or in bulk.
Just a heads up, Google might still keep some of those deleted transactions for legal reasons.

Upon deletion of your Google Pay account, your linked bank accounts will remain unaffected. Direct access to these accounts will still be available through your respective financial institution, ensuring the security of your funds and account information.
However, if you wish to remove specific bank accounts from Google Pay prior to deletion, it is recommended that you manually do so within the application.
Please be advised that the deletion of your transaction history on Google Pay may take up to 12 hours from the initiation of the process. It is important to note that certain
legal retention requirements may prevent the complete erasure of this information from Google’s records. Furthermore, the other party involved in the transaction may still have access to the deleted transactions.
When deleting your Google Pay transaction history, be aware that the information is not completely removed from Google’s servers. For legal and service-related purposes, Google retains transaction data, including
purchases, money transfers, and refunds. Additionally, the other party involved in the transaction can still access the deleted records in their transaction history. While your view of the data may change, it is not entirely erased from all records.
By deleting your Google Pay transaction history, you can improve your privacy and security by minimizing the amount of sensitive financial data stored online. While this action removes the records from your
view, it’s important to note that Google may still retain this data for legal purposes, meaning it is not permanently erased from their servers. Additionally, if someone gains access to your Google account, they could
still view your transaction history unless it has been deleted. While deleting your history can reduce the risks associated with unauthorized access, it does not completely eliminate all traces of the data.
To ensure the safety of your important transactions before deleting your Google Pay history, kindly consider the following methods:
– Screenshots: Kindly take screenshots of your transaction details, ensuring that all relevant information is captured.
– Manual Record: Please consider writing down essential transaction details, such as amounts, dates, and recipients.
– Export Data: You may use Google Takeout to export your Google Pay data, which allows you to download transaction history in a structured format.
Please ensure that your backup is stored securely, either in cloud storage or an external drive, to avoid the loss of important financial information.
Cloud backup services provide numerous benefits for storing financial data:
1. Data Protection: Cloud backups offer an additional layer of off-site protection, safeguarding against local disasters such as hardware failures or theft.
2. Accessibility: Users can conveniently access their data anytime and anywhere with an internet connection, facilitating remote work and ensuring critical information is always available.
3. Cost-Effectiveness: Cloud solutions often reduce the need for expensive hardware and maintenance, allowing for a flexible pay-as-you-go model that scales with your requirements.
4. Automation: Many services offer automated backups, minimizing manual effort and ensuring data is consistently backed up.
To procure bike insurance via Google Pay, kindly adhere to the following procedure:
1. Access Google Pay: Install the application and log in using your credentials.
2. Select Insurance Option: Tap on the “New Payment” option and search for “Insurance.”
3. Choose Insurance Provider: From the displayed list, select your preferred insurance provider.
4. Provide Vehicle Details: Enter your bike’s registration number and pertinent policy details.
5. Complete Payment: Verify the amount due and finalize the transaction by inputting your UPI PIN.
This streamlined process facilitates the swift renewal or acquisition of bike insurance online.
Of course, you can renew your bike insurance policy using Google Pay. Here’s how:
Open Google Pay: Launch the app and log in.
Select “Bills & Recharges”: Tap this option to find insurance services.

Choose “Two-Wheeler Insurance”: Enter your bike’s registration number to see renewal options.
Compare Quotes: Review different plans and select one that suits you.
Make Payment: Confirm your choice and complete the payment using your UPI PIN.
This process is quick and convenient, allowing for hassle-free insurance management.
To set up a reminder for bike insurance renewal through Google Pay, follow these steps:
1. Open the Google Pay application and navigate to the “Bills & Recharges” section.
2. Scroll down and select “Regular Payments.”
3. Choose the payment category, enter the payee’s details, start date, frequency, and amount.
Disclaimer
Google Pay expressly disavows any liability for transactions, emphasizing that these occur exclusively between users and merchants, without the involvement of Google or its associates. Users explicitly
authorize Google to share payment-related information with third parties solely for the purpose of transaction processing. However, it is important to note that Google does not assume responsibility for the accuracy of payment methods or the management of

disputes. Additionally, Google reserves the right to collect and share personal information to the extent necessary to facilitate its services. Consequently, users are expected to comply with all applicable laws and regulations when utilizing the platform.